


On any well-managed dairy farm, teat hygiene is a cornerstone of udder health, milk quality, and mastitis prevention. At the center of that hygiene routine is a small but critically important piece of equipment — the dip cup. Used multiple times every day across an entire herd, this tool makes direct contact with the teat canal environment before and after milking, meaning its cleanliness and structural integrity are not optional considerations — they are non-negotiable production standards. Understanding what best practices look like for cleaning and maintaining this equipment can make a measurable difference in somatic cell counts, infection rates, and overall farm profitability.
Whether you are managing a small family operation or a large commercial herd, the discipline applied to each dip cup in your parlor will directly reflect in your bulk tank results and in the health of your animals. This article walks through the evidence-based practices that dairy professionals use to keep their teat dipping equipment clean, functional, and reliable — from daily rinsing protocols to long-term maintenance decisions that protect your investment and your herd.
Understanding the Role of the Dip Cup in Teat Health Management
How Direct Contact Equipment Affects Infection Risk
The dip cup is designed to deliver teat dip solution uniformly to the teat surface, covering the teat end and the lower teat canal opening where bacterial entry is most likely. When a cow is milked, the teat canal temporarily remains open, creating a window during which environmental pathogens such as Streptococcus uberis or Staphylococcus aureus can ascend into the udder. Pre-dipping and post-dipping routines close that window by applying germicidal solution directly and consistently.
However, the effectiveness of any dipping routine depends entirely on the hygiene of the applicator itself. A contaminated dip cup does not just fail to protect — it can actively introduce bacteria to a vulnerable teat end. Organic residues such as manure, milk, or soil inside the cup create an ideal environment for pathogen proliferation, effectively turning the tool into a vector rather than a preventive measure. This is why cleaning practices matter as much as the dip solution chemistry itself.
Types of Dip Cup Designs and Their Maintenance Implications
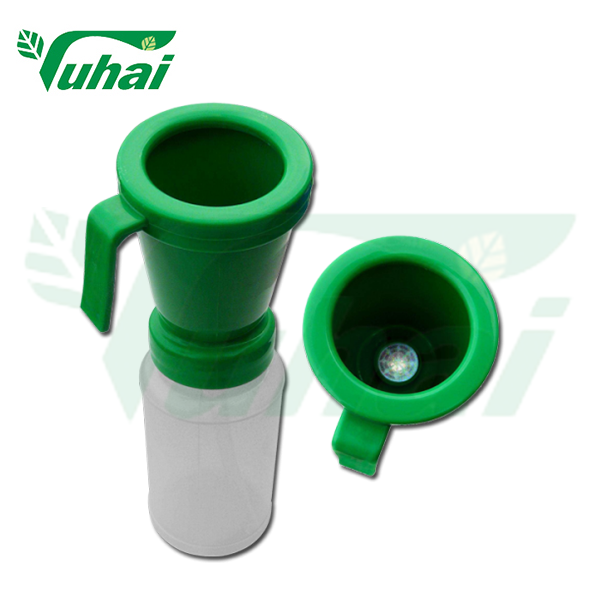
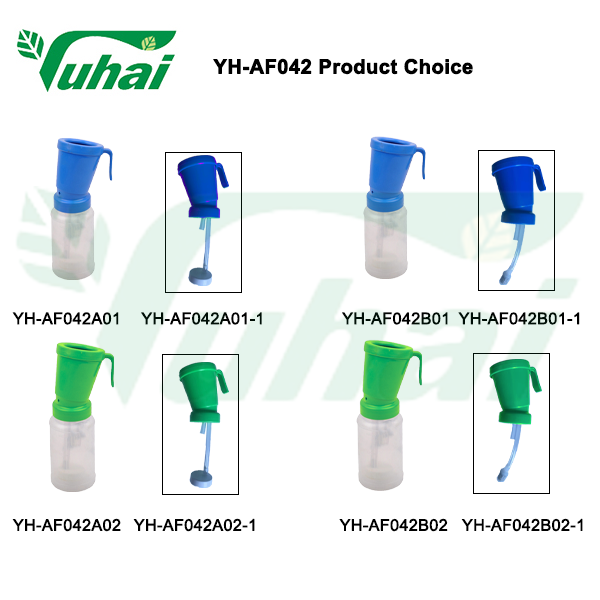
Not all dip cup designs are the same, and understanding your specific equipment helps you apply the right maintenance approach. A non-return style dip cup is engineered with an internal valve mechanism that prevents contaminated solution from returning into the reservoir after each application. This design significantly reduces cross-contamination between cows and limits the accumulation of biological debris in the solution.
PP plastic construction, as found in many modern farm-grade dip cups, is a practical choice because it resists the chemical degradation caused by iodine-based or chlorhexidine-based teat dips. However, even chemical-resistant plastics require regular inspection because micro-scratches and surface wear over time can harbor bacteria that standard rinsing does not fully remove. Knowing the material and valve construction of your equipment helps you set appropriate cleaning intervals and replacement timelines.
Daily Cleaning Protocols for the Dip Cup
Rinsing Procedures Between Cow Applications
Between individual cow applications, the primary concern is preventing the transfer of pathogens from one animal to another. With a properly designed non-return dip cup, the valve prevents contaminated solution from re-entering the reservoir. However, the exterior of the cup and the cup rim can still pick up manure or milk splatter during use in a busy milking parlor. A quick visual check before application and a wipe or rinse between groups of animals is a practical intermediate step.
For farms using open-cup designs without a non-return valve, the risk of back-contamination is considerably higher. In those cases, either replacing the solution in the dip cup between every few cows or using individual disposable cups is strongly recommended. The labor cost associated with these steps is negligible compared to the treatment cost of even a single mastitis case that requires veterinary intervention and results in discarded milk.
End-of-Session Cleaning and Disinfection
At the end of every milking session, each dip cup should go through a structured cleaning sequence rather than a simple rinse. Begin by emptying any remaining solution — never pour leftover dip solution back into the main supply container as this introduces contamination risk to your entire dip supply. Rinse the cup thoroughly with clean, lukewarm water to remove gross organic material before applying any chemical cleaner.
After the initial rinse, use an alkaline detergent solution to break down fat-based residues and biofilm that can accumulate inside the dip cup body, especially around the valve seat and the internal surfaces of the cup chamber. Allow adequate contact time as indicated by your detergent supplier, then rinse again with clean water. Follow this with an acid rinse if your farm uses alternating alkaline-acid protocols, which is recommended for controlling mineral scale buildup from hard water supplies.
Allow the dip cup to air dry completely between sessions if possible, or use clean food-grade towels. Storing damp equipment encourages microbial growth even after cleaning. Many farms designate a clean drying rack near the milking parlor specifically for teat dipping equipment so that airflow is adequate and the items do not contact contaminated surfaces during drying.
Weekly and Periodic Maintenance Practices
Deep Cleaning and Disassembly Protocols
Once or twice per week, depending on herd size and usage intensity, each dip cup should undergo a more thorough deep clean that includes full disassembly where the design allows. Remove the valve assembly and any removable internal components. Soak all parts in a diluted alkaline detergent solution for a sufficient dwell time — typically fifteen to thirty minutes — to loosen any biofilm layers that daily cleaning may not fully eliminate.
Use a soft brush or pipe cleaner to scrub internal channels and the valve seat area, as these narrow spaces are most likely to trap residue. The goal is to remove any biofilm or protein deposit that could serve as a nutrient source for bacterial growth. After scrubbing, rinse all components thoroughly and inspect each part before reassembly. A dip cup that passes visual inspection should show no discoloration, no visible deposits, and no structural deformation in the cup body or valve mechanism.
Inspection for Wear, Cracks, and Seal Integrity
Physical inspection during deep cleaning is the most effective way to catch early signs of equipment degradation before it affects hygiene performance. Look closely at the cup rim for chips or micro-cracks, as these imperfections create harborage sites for bacteria that cannot be removed even with aggressive chemical cleaning. A cracked dip cup rim also fails to form a proper seal around the teat during application, reducing dip coverage and potentially splashing solution into the teat canal opening.
Check the non-return valve function by squeezing and releasing the cup while observing the valve response. A properly functioning valve should allow forward flow of solution while preventing reverse flow when pressure is released. Any dip cup that shows sluggish valve response, incomplete closure, or visible damage to the valve seat should be removed from service immediately. Continuing to use defective equipment compromises your entire teat hygiene program and creates an inconsistent application that is difficult to detect through routine observation alone.
Chemical Compatibility and Solution Management
Matching Your Dip Solution to Your Equipment Material
The chemistry of the teat dip solution you use matters significantly for long-term equipment integrity. Iodine-based teat dips, which are the most widely used in the dairy industry, are generally compatible with PP plastic construction but can cause accelerated degradation in lower-grade or non-food-safe plastics over extended periods. Always confirm that the dip cup material you are using is rated for the specific dip chemistry in your protocol.
Chlorhexidine-based and lactic acid-based teat dips are gaining popularity on farms with specific regulatory or residue concerns. These formulations have their own material compatibility profiles. When switching dip chemistries, rinse and clean all dip cup equipment thoroughly before introduction of the new product to avoid unexpected chemical interactions or residue contamination that could compromise dip efficacy at the teat surface.
Preventing Solution Contamination in the Dip Cup
Even a perfectly clean dip cup can carry contaminated solution if the product itself has been mismanaged. Fill your dip cups from sealed or covered supply containers rather than open buckets that have been left exposed in the parlor environment. Teat dip solutions have a defined working concentration, and dilution from parlor washdown water or contamination from dirty hands can reduce efficacy below effective thresholds without any visible change in the solution's appearance.
Label your teat dip containers clearly and follow the recommended mixing ratios precisely. A dip cup filled with correctly prepared and uncontaminated solution, combined with clean equipment, delivers the full antimicrobial protection the product is designed to provide. Deviating from either standard creates unpredictable outcomes that are difficult to trace when somatic cell counts begin to rise or mastitis incidence increases across the herd.
Farm-Level Systems for Consistent Dip Cup Maintenance
Building a Routine That Farm Staff Will Follow
Equipment hygiene is only as strong as the farm culture surrounding it. The best protocols for cleaning and maintaining a dip cup are those that are documented, communicated clearly to all parlor staff, and reinforced through regular observation. Standard operating procedures should specify not just what to clean, but how to clean, with what products, at what concentrations, and at what frequency. Ambiguous instructions lead to inconsistent execution, which creates unpredictable hygiene outcomes.
Assign specific responsibility for checking and cleaning dip cups to designated milking staff rather than leaving it as a general shared task. When accountability is unclear, cleaning steps are the first to be skipped when time pressure builds during morning milking. A simple checklist posted in the parlor that staff initial after completing cleaning steps creates both a habit and a record that farm managers can review during milk quality audits.
Replacement Timelines and Inventory Management
Even with rigorous cleaning and inspection, a dip cup has a finite service life. Most farm advisors recommend establishing a maximum usage period — often three to six months depending on herd size, milking frequency, and the aggressiveness of the dip chemistry used — beyond which equipment is replaced regardless of apparent condition. This approach removes the subjectivity of visual inspection as the sole criteria and ensures that hidden micro-damage does not silently undermine your teat hygiene program.
Maintain an adequate inventory of replacement dip cups so that damaged or worn equipment can be swapped immediately without delay. Running a milking session with a defective dip cup because replacements are not on hand is a preventable risk. Factor replacement cups into your annual parlor supply budget as a routine cost rather than an emergency expense. The unit cost of a quality PP plastic non-return dip cup is modest relative to the potential cost of a single mastitis outbreak affecting multiple animals in your herd.
FAQ
How often should a dip cup be replaced on a dairy farm?
The recommended replacement interval for a dip cup depends on usage frequency, dip chemistry, and the results of regular inspection. As a general guideline, most farm advisors suggest replacing equipment every three to six months under normal use conditions. Any dip cup showing visible cracks, valve malfunction, or surface degradation should be replaced immediately regardless of its age.
Can the same dip cup be used for both pre-dipping and post-dipping?
It is strongly advisable to use separate, clearly labeled equipment for pre-dip and post-dip applications because the two solutions typically have different formulations and concentrations. Using the same dip cup for both purposes without thorough cleaning between sessions risks cross-contamination of your dip solutions and may reduce the efficacy of both products. Dedicated equipment for each function is the safest and most professionally accepted approach.
What is the advantage of a non-return valve dip cup compared to a standard open cup?
A non-return valve dip cup prevents contaminated solution from flowing back into the reservoir after contact with the teat, which significantly reduces the risk of spreading pathogens from cow to cow during a milking session. A standard open cup allows backflow, meaning organic material from one animal's teat can contaminate the solution for subsequent animals. For farms concerned with controlling contagious mastitis pathogens, the non-return design offers a meaningful hygiene advantage that directly supports herd health outcomes.
What cleaning products are safe to use when washing a dip cup?
Alkaline detergents formulated for dairy equipment are the standard choice for routine dip cup cleaning because they effectively break down fat residues and biofilm without damaging PP plastic components. Acid cleaners are typically used on a weekly basis to manage mineral scale from hard water. Avoid using abrasive cleaning tools or harsh solvents not rated for food-grade dairy equipment, as these can scratch interior surfaces or degrade the material, creating harborage sites for bacteria and shortening the useful life of the dip cup.