


For dairy farmers, teat hygiene is one of the most critical factors in maintaining herd health and milk quality. The dip cup is a fundamental tool in this process, used before and after milking to apply teat disinfectant and reduce the risk of mastitis and bacterial contamination. Yet despite its simplicity, the dip cup is one of the most misused pieces of equipment on the farm. Small errors in technique, maintenance, or product selection can quietly undermine an entire teat hygiene program, leading to increased infection rates, reduced milk yields, and unnecessary veterinary costs.
Understanding where farmers commonly go wrong with the dip cup — and how to correct those mistakes — is essential for anyone serious about udder health management. This article breaks down the most frequent errors observed in real farm environments and provides practical, actionable guidance to help you get the most out of every dip cup application. Whether you manage a small herd or a large commercial dairy operation, these insights will help you build a more consistent and effective teat hygiene routine.
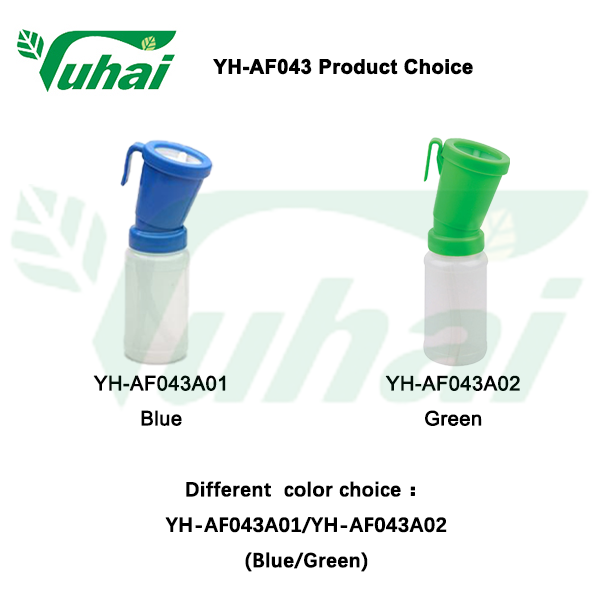
Incorrect Dip Cup Selection for the Task
Using the Wrong Cup Design for Pre- or Post-Dipping
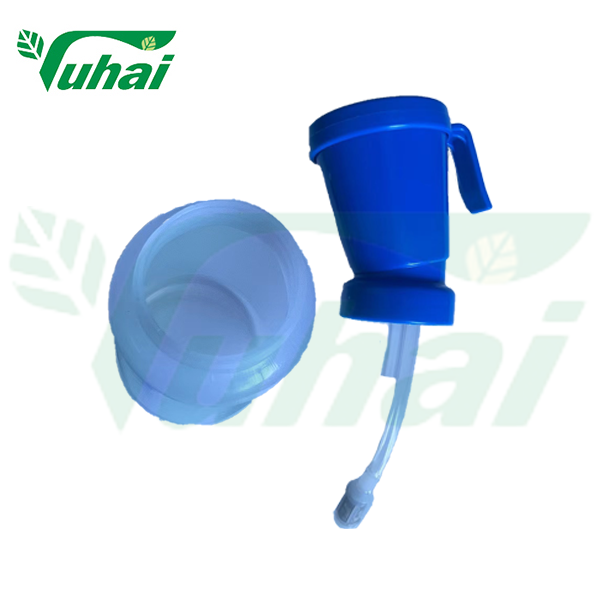
One of the first mistakes farmers make is treating all dip cup designs as interchangeable. In reality, different cup designs serve different purposes. A non-return dip cup, for example, is specifically engineered to prevent used solution from flowing back into the reservoir, which is critical for maintaining solution integrity during post-dipping. Using a basic open-style cup for post-dipping allows contaminated liquid to re-enter the container, spreading bacteria from one teat to the next.
Farmers who do not distinguish between cup types often end up applying contaminated disinfectant, which defeats the entire purpose of the hygiene step. When selecting a dip cup, always match the design to the specific stage of the milking routine. A non-return valve design is strongly recommended for post-milking applications where cross-contamination risk is highest.
Material choice also matters. A dip cup made from food-grade PP plastic offers chemical resistance and durability without reacting with common iodine or chlorhexidine-based solutions. Choosing a cup made from incompatible materials can cause degradation over time, leading to micro-cracks that harbor bacteria and compromise the structural integrity of the tool.
Ignoring Capacity and Ergonomics
Another overlooked aspect of dip cup selection is capacity. A cup that is too small requires constant refilling during milking sessions, slowing down the workflow and increasing the temptation to skip dipping steps. A 300ml capacity dip cup is generally well-suited for most dairy operations, offering enough volume to work through a reasonable number of animals without constant interruption.
Ergonomics also play a role in consistency. A poorly shaped dip cup that is difficult to hold or angle correctly leads to incomplete teat coverage. Farmers often rush through dipping when the tool feels awkward, resulting in only partial contact between the disinfectant and the teat surface. Choosing a dip cup with a well-designed grip and a cup opening that fits the teat comfortably encourages proper technique and full coverage every time.
Poor Application Technique During Dipping
Insufficient Teat Coverage
Even with the right dip cup in hand, incorrect application technique is one of the most common sources of failure in teat hygiene programs. The most frequent error is insufficient coverage — applying the disinfectant to only part of the teat rather than the entire teat surface including the teat end. The teat end is the primary entry point for mastitis-causing pathogens, so incomplete coverage at this critical zone leaves the animal vulnerable.
Proper technique requires the farmer to fully immerse the teat in the dip cup, ensuring the solution contacts the entire teat from the base to the tip. This means tilting the cup at the correct angle and holding it in place for a moment rather than simply touching the teat end and moving on. Rushing through this step is one of the most common reasons teat hygiene programs fail to deliver expected results.
Training milking staff on correct dip cup technique is just as important as having the right equipment. Even experienced workers can develop bad habits over time, particularly during high-volume milking sessions when fatigue sets in. Regular observation and refresher training help maintain consistent standards across the entire herd.
Skipping Pre-Dipping or Post-Dipping Steps
Some farmers use the dip cup only for post-milking disinfection and skip the pre-dipping step entirely, or vice versa. Both steps serve distinct purposes and should not be treated as optional. Pre-dipping with a dip cup helps remove environmental bacteria from the teat surface before the milking unit is attached, reducing the risk of introducing contaminants into the milk. Post-dipping seals the teat canal after milking, when it remains open and highly susceptible to bacterial entry.
Omitting either step creates a gap in the hygiene protocol that pathogens can exploit. Research consistently shows that farms using both pre- and post-dipping with a properly maintained dip cup experience significantly lower rates of new mastitis infections compared to those using only one step. The dip cup is only as effective as the protocol it is part of.
Neglecting Dip Cup Cleaning and Maintenance
Infrequent Cleaning Between Uses
A dip cup that is not cleaned regularly becomes a source of contamination rather than a hygiene tool. Many farmers rinse the cup at the end of the day but do not clean it thoroughly between milking sessions or between individual animals. Organic matter, milk residue, and bacteria accumulate inside the cup and in the non-return valve mechanism, creating a reservoir of pathogens that gets applied directly to teat surfaces.
Best practice is to clean and sanitize the dip cup at least once per milking session, and to inspect the non-return valve regularly to ensure it is functioning correctly. A valve that is stuck open or partially blocked will either allow backflow contamination or restrict solution flow, both of which compromise the effectiveness of the dip cup application.
Cleaning should involve rinsing with warm water, followed by a proper sanitizing solution appropriate for the cup material. Avoid abrasive cleaning tools that can scratch the interior surface of a PP plastic dip cup, as scratches create microscopic grooves where bacteria can persist even after cleaning.
Failing to Replace Worn or Damaged Cups
Farmers often continue using a dip cup long past its useful service life. Cracks, discoloration, warping, or a malfunctioning non-return valve are all signs that the cup needs to be replaced. A cracked dip cup cannot be properly sanitized and may harbor persistent bacterial colonies regardless of how frequently it is cleaned.
The cost of replacing a dip cup is minimal compared to the cost of treating a single mastitis case. Establishing a routine inspection schedule — checking each dip cup for physical damage at the start of every week — helps catch problems early before they affect herd health. Keeping spare cups on hand ensures that a damaged cup can be replaced immediately without disrupting the milking routine.
Errors in Disinfectant Solution Management
Using Incorrect Concentrations
The dip cup is only as effective as the solution it contains. A very common mistake is preparing teat dip solutions at incorrect concentrations — either too dilute to be effective or too concentrated, which can cause teat skin irritation and cracking. Both extremes are harmful. Diluted solutions fail to kill pathogens, while overly concentrated solutions damage the teat skin barrier, paradoxically increasing susceptibility to infection.
Always follow the manufacturer's dilution guidelines for the specific teat dip product being used, and use a calibrated measuring tool when preparing solutions. Guessing at concentrations is a surprisingly common practice on busy farms and is one of the easiest mistakes to eliminate with a small investment in proper measuring equipment.
Leaving Solution in the Dip Cup Too Long
Another frequent error is filling the dip cup at the start of the day and using the same solution throughout multiple milking sessions without refreshing it. Over time, the active ingredients in teat dip solutions degrade, particularly when exposed to organic matter, light, and temperature fluctuations. A solution that was effective at the start of the morning milking may have significantly reduced efficacy by the afternoon session.
The dip cup should be emptied, cleaned, and refilled with fresh solution at the start of each milking session. Any solution remaining at the end of a session should be discarded rather than stored in the cup for later use. This simple discipline ensures that every teat receives the full protective benefit of a properly concentrated, uncontaminated disinfectant every time the dip cup is used.
Storage of bulk teat dip solution also matters. Keep concentrated products in sealed containers away from direct sunlight and extreme temperatures. Degraded concentrate produces ineffective working solutions regardless of how carefully the dip cup is used.
Inconsistent Protocols Across the Milking Team
Lack of Standardized Procedures
On farms with multiple milking staff, inconsistency in how the dip cup is used from one person to the next is a significant and often underestimated problem. One worker may apply full teat coverage while another barely touches the teat end. One may clean the cup between animals while another does not. These inconsistencies mean that some animals in the herd receive effective hygiene protection while others do not, creating uneven mastitis risk across the herd.
Establishing a written standard operating procedure for dip cup use — covering solution preparation, application technique, cleaning frequency, and cup replacement criteria — removes ambiguity and gives all team members a clear reference point. Posting this procedure in the milking parlor where it is visible during work reinforces compliance without requiring constant supervision.
Inadequate Training for New Staff
New milking staff are particularly prone to dip cup errors simply because they have not been shown the correct technique. Handing a new worker a dip cup without proper instruction and assuming they will figure it out is a recipe for inconsistent hygiene outcomes. Even workers with prior farm experience may have learned incorrect habits at previous operations.
A structured onboarding process that includes hands-on demonstration of correct dip cup technique, followed by supervised practice, significantly reduces the risk of errors becoming ingrained habits. Pairing new staff with experienced workers during their first milking sessions allows real-time correction of technique before problems develop. Investing time in training at the start saves considerably more time and money in mastitis management later.
FAQ
How often should I clean my dip cup during a milking session?
The dip cup should be cleaned and sanitized at the start of each milking session and inspected regularly during use. If you notice visible contamination or the solution appears discolored, clean and refill the cup immediately. For non-return valve designs, check that the valve is functioning correctly at each cleaning to prevent backflow contamination.
Can I use the same dip cup solution for both pre- and post-dipping?
Pre- and post-dipping solutions are often formulated differently. Pre-dip products typically focus on cleaning and reducing bacterial load before milking, while post-dip products are formulated to seal the teat canal and provide a protective barrier after milking. Using the same solution for both steps may reduce the effectiveness of your hygiene program. Always check the product label and consult your veterinarian or herd health advisor for guidance specific to your operation.
How do I know when it is time to replace my dip cup?
Replace your dip cup if you notice any cracks, warping, persistent discoloration that does not clean off, or a non-return valve that is stuck, leaking, or not seating properly. As a general rule, inspect each dip cup weekly and replace any cup showing signs of physical wear. Given the low cost of a replacement cup relative to the cost of a mastitis case, erring on the side of early replacement is always the better decision.
Does the material of the dip cup affect its performance?
Yes, material matters. A dip cup made from food-grade PP plastic offers good chemical resistance to common teat dip solutions including iodine and chlorhexidine-based products, and it is durable enough for daily farm use. Avoid cups made from materials that are not rated for chemical contact, as these can degrade over time, leach unwanted compounds into the solution, and develop surface damage that makes thorough cleaning difficult.