


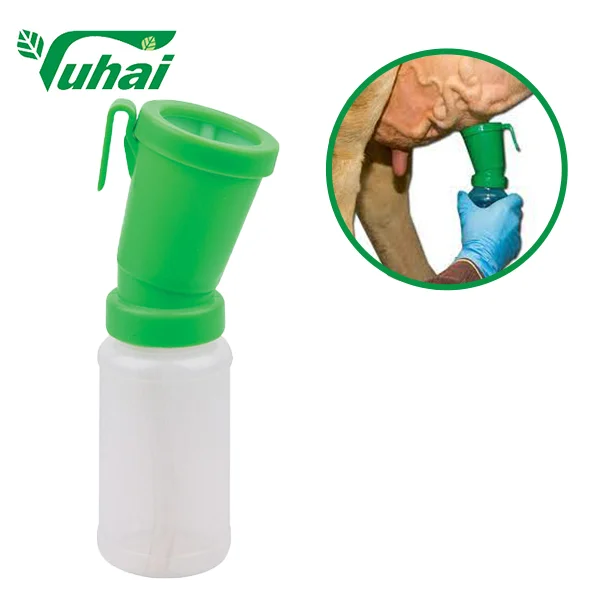
Post-milking teat disinfection remains one of the most critical control points in dairy herd health management, directly influencing mastitis incidence rates and milk quality outcomes. The effectiveness of this biosecurity measure hinges not only on the chemical properties of the disinfectant solution but equally on the mechanical delivery method employed. Understanding how to properly use a dip cup during post-milking teat disinfection ensures complete coverage, minimizes cross-contamination risks, and maximizes the protective barrier formed on teat skin surfaces immediately after milking unit detachment.
Proper technique with a dip cup transcends simply applying liquid to the teat surface. It involves a systematic approach that accounts for solution volume control, contact time optimization, application angle consistency, and contamination prevention protocols. Dairy operations that establish rigorous protocols around dip cup usage consistently demonstrate lower somatic cell counts and reduced clinical mastitis events compared to facilities where application methods vary between milking sessions or individual operators. This comprehensive guide examines the technical methodology, operational workflow, quality control checkpoints, and troubleshooting strategies necessary to implement best-practice dip cup protocols across commercial dairy environments.
Understanding the Mechanical Function of the Dip Cup in Teat Disinfection
Design Principles That Enable Effective Solution Delivery
The functional design of a dip cup incorporates specific engineering features that facilitate complete teat coverage while preventing solution backflow contamination. Modern dip cup architectures typically feature a contoured interior chamber that accommodates the anatomical profile of bovine teats across different breed types and lactation stages. The cup diameter must provide sufficient clearance around the teat circumference to allow solution contact without requiring excessive insertion depth that could introduce mechanical irritation to sensitive teat apex tissue. Internal volume capacity directly correlates with the number of consecutive applications possible before refilling becomes necessary, influencing workflow efficiency during high-throughput milking operations.
Non-return valve mechanisms integrated into quality dip cup designs serve as critical biosecurity components by preventing used solution containing microbial contaminants from flowing back into the main reservoir after teat withdrawal. This one-way flow architecture maintains solution sterility throughout the application sequence, eliminating a primary vector for pathogen transmission between individual animals. The valve actuation threshold must balance ease of solution dispensing during normal insertion depth against reliable closure during withdrawal motion, requiring precision manufacturing tolerances to function consistently across thousands of application cycles.
Solution Volume Requirements for Complete Teat Coverage
Achieving complete teat surface coverage requires precise solution volume calibration relative to average teat dimensions within the specific herd population. Research protocols consistently demonstrate that coverage of at least the lower two-thirds of teat length, including complete circumference around the teat barrel and apex region, provides optimal protection against ascending bacterial colonization through the teat canal. Insufficient solution volume results in incomplete coverage with exposed surface areas vulnerable to pathogen attachment, while excessive volume leads to solution wastage and increased chemical exposure to surrounding udder skin that may contribute to tissue irritation over prolonged periods.
Practical volume requirements typically range between fifteen and twenty-five milliliters per teat depending on breed-specific size variations, with larger frame dairy breeds requiring volumes toward the upper end of this spectrum. Operators should verify that the dip cup reservoir depth allows the teat to be inserted to a standardized depth marker that corresponds with validated coverage zones, creating a repeatable reference point that eliminates guesswork and technique variation between different milking staff members. Regular calibration checks using transparent dip cups filled with colored water enable visual confirmation that solution levels remain adequate throughout multi-cow application sequences.
Step-by-Step Protocol for Dip Cup Application Technique
Pre-Application Preparation and Solution Management
Effective dip cup utilization begins before the first teat contact occurs, starting with proper disinfectant solution preparation according to manufacturer dilution specifications. Many commercial teat disinfectants require precise concentration ratios to achieve labeled efficacy claims, with both under-dilution and over-dilution compromising antimicrobial performance or increasing tissue irritation potential. Temperature considerations also affect solution performance, as excessively cold solutions may reduce contact time effectiveness and cause cow discomfort, while elevated temperatures can accelerate chemical degradation of active ingredients in certain formulation types.
The dip cup should be filled to the recommended capacity line, typically indicated by embossed markings or colored bands on translucent cup bodies, before beginning the application sequence. Overfilling creates spillage risks and solution waste, while underfilling necessitates frequent interruptions for refilling that disrupt workflow continuity and extend overall milking duration. Solution turbidity should be monitored throughout the milking session, as visible contamination with organic matter indicates the need for complete solution replacement rather than simple topping off, which would dilute active ingredient concentrations below effective thresholds.
Optimal Insertion Depth and Contact Time Execution
The physical insertion technique represents the most critical operator-dependent variable in dip cup effectiveness. The teat should be inserted vertically into the dip cup until solution level reaches approximately two-thirds up the teat barrel length, ensuring complete immersion of the teat apex and canal opening where bacterial entry risk concentrates highest. Angled insertion or insufficient depth leaves the teat end inadequately protected, while excessive insertion depth that submerges the entire teat up to the udder attachment point wastes solution and increases chemical contact with sensitive udder skin tissue.
Contact duration within the dip cup solution must meet minimum exposure time requirements specified by disinfectant manufacturers, typically ranging from three to five seconds for iodophor-based products and up to eight seconds for certain barrier-forming formulations. Rushing this contact phase by immediately withdrawing the teat after insertion prevents adequate chemical interaction with teat surface proteins and lipids, reducing the formation of the protective film that provides extended antimicrobial activity between milking sessions. Operators should establish a consistent rhythm that incorporates the required contact time as an automatic component of the dipping motion rather than relying on mental counting, which becomes unreliable during repetitive task execution.
Withdrawal Technique and Drainage Management
The withdrawal motion from the dip cup should occur smoothly without agitation or splashing that could disrupt the solution film forming on the teat surface. A straight vertical withdrawal path maintains even solution distribution and activates the non-return valve mechanism cleanly without creating turbulence that draws contaminated solution back toward the teat. Some advanced dip cup designs incorporate internal baffles or flow directors that enhance drainage patterns during withdrawal, channeling excess solution away from the teat rather than allowing it to run down toward udder attachment points where pooling could occur.
After withdrawal, allowing a brief drainage period of one to two seconds before the cow moves away from the milking position enables excess solution to drip back into the cup rather than transferring to stall surfaces where it creates slip hazards and chemical exposure concerns. This drainage phase also allows the protective film to begin setting on the teat surface, improving adhesion characteristics that extend residual antimicrobial activity duration. Operators should avoid physically wiping or touching treated teats after dip cup application, as mechanical contact disrupts the chemical barrier before it has fully formed and potentially reintroduces contaminants from hands or clothing.
Contamination Prevention and Biosecurity Protocol Integration
Managing Cross-Contamination Risks Between Individual Animals
Despite the protective features built into modern dip cup designs, contamination risks persist if proper handling protocols are not maintained throughout the milking workflow. The external surfaces of the dip cup inevitably contact operators' hands, gloves, and occasionally udder surfaces during application sequences, creating potential pathways for pathogen transfer if these contact points are not managed appropriately. Establishing a dedicated handling zone where the dip cup is grasped consistently at specific locations away from the solution contact area helps minimize cross-contamination vectors.
Solution replacement intervals must be determined based on visible contamination indicators rather than arbitrary cow count targets, as organic load accumulation varies significantly depending on udder cleanliness status entering the milking parlor. When solution turbidity becomes apparent, milk residue particles are visible, or the solution level drops below minimum effective depth markers, complete solution disposal and cup rinsing should occur before refilling with fresh disinfectant. Some operations implement a numerical tracking system using tally counters to prompt solution changes after a predetermined number of cow exposures, typically ranging from twenty to thirty animals depending on pre-milking udder preparation thoroughness.
Equipment Sanitation and Maintenance Requirements
Between milking sessions, dip cups require thorough cleaning to remove disinfectant residues, organic matter accumulation, and mineral deposits that can compromise solution performance during subsequent use. A three-step cleaning protocol involving rinse, detergent wash, and final rinse effectively removes residue buildup without degrading the plastic materials or valve components that comprise most dip cup construction. Hot water temperatures between fifty and sixty degrees Celsius enhance detergent efficacy without reaching levels that could warp thermoplastic cup bodies or degrade elastomeric valve seals.
Periodic inspection of the non-return valve mechanism ensures continued functionality across extended service periods, as valve degradation represents a primary failure mode that compromises biosecurity benefits. Visual examination should confirm that valve components seat properly when the cup is inverted, preventing solution backflow under gravity alone. Functional testing by filling the dip cup and inserting a simulated teat object verifies that solution dispenses freely during insertion but the valve closes effectively during withdrawal, maintaining the one-way flow characteristic essential for contamination prevention. Replacement of degraded valve components according to manufacturer service intervals prevents gradual performance deterioration that often goes unnoticed until contamination events manifest as elevated mastitis rates.
Integration with Complete Milking Parlor Workflow Systems
Positioning Within the Post-Milking Process Sequence
The dip cup application must occur immediately following milking unit detachment to capitalize on the brief window when teat canal sphincter muscles remain relaxed and most vulnerable to bacterial penetration. Delays between cluster removal and disinfectant application allow this critical exposure period to pass without protection, substantially reducing the preventive value of the teat dipping procedure regardless of solution chemistry or application technique quality. Workflow design should position the dip cup within arm's reach of the milking operator's normal working position, eliminating unnecessary motion that introduces time delays or encourages procedural shortcuts during high-volume milking sessions.
In rotary parlor configurations, the dip cup station should be located at a fixed angular position relative to cluster detachment that provides adequate time for thorough four-teat treatment before the cow exits the platform. Parallel parlor layouts benefit from dip cup placement on a dedicated utility shelf or rail system that moves with the operator between stall positions, maintaining consistent positioning relative to the work zone. Some automated milking systems incorporate robotic dip cup applicators that activate following cluster removal, though these systems require careful calibration to achieve coverage quality comparable to skilled manual application.
Training Protocols for Consistent Operator Technique
Establishing standardized dip cup protocols across multiple milking personnel requires structured training programs that combine theoretical knowledge with supervised practical application sessions. New operators should understand not only the mechanical steps of dip cup usage but also the biological rationale underlying each protocol element, creating cognitive frameworks that support technique retention and quality maintenance when supervision is not immediately present. Video documentation of correct technique provides reference material for ongoing training reinforcement and serves as an objective standard for performance evaluation during quality audits.
Competency assessment should verify that each operator can consistently achieve complete teat coverage across multiple consecutive applications while maintaining appropriate contact time durations and contamination prevention practices. Fluorescent dye additives mixed into training solutions enable visual verification of coverage patterns under ultraviolet illumination, providing immediate feedback about technique effectiveness that accelerates skill acquisition. Periodic recertification sessions reinforce protocol adherence and provide opportunities to introduce updated best practices as new research evidence emerges regarding optimal disinfection methodologies.
Troubleshooting Common Dip Cup Application Challenges
Addressing Incomplete Coverage and Solution Distribution Issues
Incomplete teat coverage despite proper dip cup insertion depth often indicates inadequate solution volume in the cup reservoir or excessive solution viscosity that prevents proper flow around teat contours. Operators should verify that solution levels remain above minimum fill lines throughout multi-cow application sequences, implementing refill triggers based on visual inspection rather than relying on memory of previous fill timing. Solutions exhibiting abnormal thickness or gel-like consistency may have been stored at inappropriate temperatures or exceeded shelf life stability limits, requiring disposal and replacement with fresh product batches.
Anatomical variations in teat shape and size occasionally create coverage challenges with standard dip cup designs, particularly for animals with unusually short teats, conical teat profiles, or significant diameter variations between front and rear quarters. These situations may require alternative application methods such as foam-based applicators or spray systems that accommodate broader anatomical ranges, though these alternatives introduce different technique requirements and contamination risk profiles that must be evaluated relative to specific herd circumstances. Custom dip cup sizing options are available from specialized suppliers for herds with consistent breed-specific dimensional characteristics that fall outside standard equipment design parameters.
Managing Solution Performance Degradation and Chemical Compatibility
Gradual reductions in disinfection efficacy despite proper dip cup technique often reflect chemical degradation of active ingredients due to storage condition failures or incompatible mixing practices. Iodophor formulations are particularly sensitive to light exposure and temperature extremes, with potency declining rapidly when stored in clear containers under direct sunlight or in uninsulated storage areas experiencing temperature fluctuations. Solution preparation using water sources with high mineral content or extreme pH values can interfere with disinfectant chemistry, necessitating water quality testing and potential treatment before use in teat dip preparation protocols.
Some operations attempt to extend solution use intervals by periodically adding concentrated disinfectant to partially depleted dip cups rather than performing complete solution changes, an economy measure that often backfires by creating unpredictable concentration gradients and dilution of active ingredients with organic contaminants accumulated from previous applications. This practice also interferes with accurate tracking of solution usage rates relative to animal throughput, obscuring data that could identify procedural inefficiencies or equipment malfunctions affecting chemical consumption patterns. Strict adherence to complete solution replacement protocols maintains consistent antimicrobial activity and provides reliable performance benchmarks for quality monitoring purposes.
FAQ
How often should the disinfectant solution in a dip cup be changed during a single milking session?
The disinfectant solution in a dip cup should be changed whenever visible contamination appears, solution level drops below effective depth markers, or after treating approximately twenty to thirty cows, whichever occurs first. High organic load conditions may necessitate more frequent changes, while exceptionally clean herds might safely extend intervals slightly. The key indicator is solution clarity, as turbidity signals contamination that compromises disinfectant efficacy. Never simply top off contaminated solution, as this dilutes active ingredient concentrations below effective thresholds while retaining pathogen loads that defeat the biosecurity purpose of the entire procedure.
What insertion depth achieves optimal teat coverage when using a dip cup?
Optimal insertion depth positions the solution level at approximately two-thirds of the teat barrel length, ensuring complete immersion of the teat apex and canal opening while avoiding unnecessary chemical contact with udder attachment tissue. This depth provides comprehensive coverage of the high-risk entry zone where bacteria most readily penetrate the teat canal while minimizing solution waste and tissue irritation potential. Operators should establish visual reference points on the dip cup body that correspond to this target depth for their specific herd's average teat dimensions, creating a consistent standard that eliminates technique variation between different staff members or milking shifts.
Can the same dip cup be used for both pre-milking preparation and post-milking disinfection?
Using the same dip cup for both pre-milking and post-milking applications is not recommended due to contamination cross-over risks and chemical incompatibility concerns between different solution types. Pre-milking solutions often contain detergent components or stimulant additives that would interfere with post-milking disinfectant chemistry if residues remained in the cup. Additionally, organic matter removed during pre-milking cleaning would contaminate the post-milking disinfectant reservoir, reducing its protective efficacy. Maintaining dedicated equipment for each application phase preserves solution integrity and prevents workflow confusion that could result in applying inappropriate products at wrong process stages, both of which compromise udder health outcomes.
What are the signs that a dip cup's non-return valve needs replacement?
Non-return valve degradation manifests through several observable indicators including solution backflow when the dip cup is inverted after teat withdrawal, visible gaps or misalignment in valve component seating, loss of elasticity in rubber valve elements indicated by permanent deformation, or increased resistance during teat insertion that suggests valve sticking. Functional testing should occur weekly by filling the dip cup and performing insertion-withdrawal cycles with a cylindrical test object, observing whether solution remains contained during the withdrawal phase. Any backflow exceeding a few drops indicates valve failure requiring immediate component replacement to restore contamination prevention functionality that represents the primary biosecurity advantage of modern dip cup designs over open-container dipping methods.
Table of Contents
- Understanding the Mechanical Function of the Dip Cup in Teat Disinfection
- Step-by-Step Protocol for Dip Cup Application Technique
- Contamination Prevention and Biosecurity Protocol Integration
- Integration with Complete Milking Parlor Workflow Systems
- Troubleshooting Common Dip Cup Application Challenges
-
FAQ
- How often should the disinfectant solution in a dip cup be changed during a single milking session?
- What insertion depth achieves optimal teat coverage when using a dip cup?
- Can the same dip cup be used for both pre-milking preparation and post-milking disinfection?
- What are the signs that a dip cup's non-return valve needs replacement?